How to Test for Mold in Your Attic?
Mold growth in the attic can lead to a myriad of problems, such as structural damage, poor indoor air quality, and potential health issues. Detecting mold in its early stages is crucial for preventing extensive damage and mitigating health risks. In this comprehensive guide, we will walk you through various methods to test for mold in the attic, step-by-step. From initial inspections to advanced testing techniques, we will cover everything you need to know to ensure a mold-free and healthy living environment.
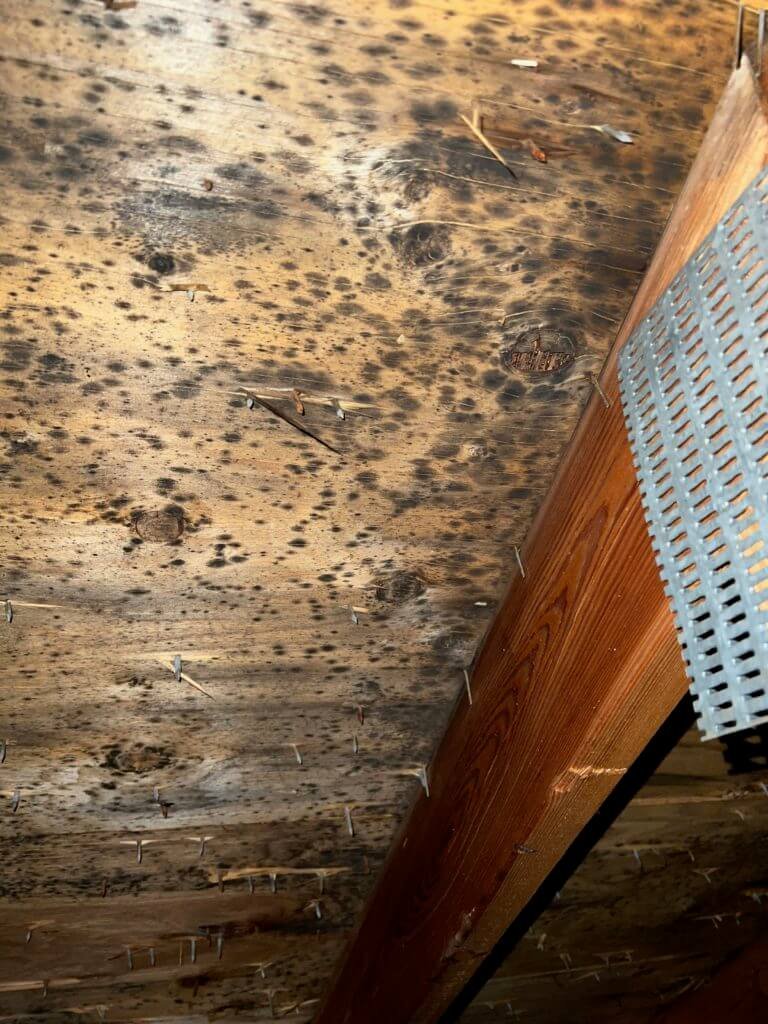
Step 1: Initial Inspection
Before diving into specialized mold testing, conduct a thorough initial inspection of your attic. This step will help you identify potential problem areas and guide you toward a more focused testing approach.
1. Visual Inspection: Use a flashlight to carefully inspect the attic’s interior for any visible signs of mold growth. Look for patches of discoloration, dark spots, or a fuzzy texture on the surfaces.
2. Musty Odors: Pay attention to any musty or earthy smells in the attic. These odors are often indicative of mold growth.
3. Water Leaks: Check for signs of water intrusion, such as water stains or damp spots on the attic’s walls, ceilings, and insulation. Mold thrives in moist environments.
Step 2: DIY Mold Testing Kits
If you’ve noticed suspicious signs during the initial inspection, you can use DIY mold testing kits to get a preliminary idea of mold presence. These kits are widely available at hardware stores and online retailers.
1. Swab Tests: Swab a suspicious area with a provided cotton swab and place it into a container. Follow the instructions on the kit to culture the sample, which will indicate whether mold is present.
2. Tape Lift Tests: Use adhesive tape from the kit to collect mold spores from surfaces. Transfer the tape to a slide and examine it under a microscope to identify mold spores.
Please note that DIY kits have limitations, as they may not provide accurate identification of mold species or the extent of the infestation.
Step 3: Hiring a Professional Mold Inspector
For a more accurate and detailed assessment of mold in your attic, consider hiring a professional mold inspector. Certified mold inspectors are equipped with the expertise and tools necessary to conduct thorough examinations.
1. Visual Assessment: A mold inspector will visually examine your attic, looking for signs of mold growth, water damage, and potential sources of moisture.
2. Air Sampling: The inspector may collect air samples to measure the concentration of mold spores in the attic. These samples will be analyzed in a laboratory to identify mold types and quantities.
3. Surface Sampling: Samples from various surfaces in the attic, such as walls and insulation, might be collected to ascertain the extent of the mold infestation.
Step 4: Infrared Thermography
Infrared thermography, also known as thermal imaging, is an advanced technique used to detect moisture in building materials, a common precursor to mold growth. It works by capturing temperature variations and identifying potential moisture sources.
1. Infrared Camera: A professional with an infrared camera will scan the attic’s surfaces, identifying areas with temperature discrepancies that could indicate moisture.
2. Moisture Mapping: The data collected is used to create a moisture map, which helps pinpoint specific areas prone to mold growth.
Step 5: Identifying Mold Species
Identifying the type of mold in your attic is essential for understanding its potential health risks and determining the most effective removal methods.
1. Laboratory Analysis: Samples collected during professional inspections are sent to a laboratory for analysis. Trained technicians will identify the mold species present.
2. Report and Recommendations: Based on the laboratory results, the mold inspector will provide a detailed report, along with recommendations for remediation.
Step 6: Remediation and Prevention
If mold is detected in your attic, prompt remediation is necessary to eliminate it effectively and prevent future growth.
1. DIY Remediation: If the mold infestation is minor, you can attempt to remove it yourself using appropriate safety measures and mold-specific cleaning agents.
2. Professional Remediation: Extensive mold infestations require professional remediation services. Experts will safely remove and dispose of affected materials, clean the area, and implement preventive measures.
3. Preventive Measures: After remediation, take steps to prevent future mold growth by addressing the source of moisture, improving ventilation, and maintaining a dry attic.